Basic Notifications in Android

Below I am going to talk about how to create and send a basic notification from your app.

What are Android Notifications?

Notifications are a way to notify user of something significant in a timely manner. These notifications can be generated by the system or by any app. The notifications are important because they enable user to be notified of any information at any time (outside of the regular flow of the app), hence the user doesn’t need to open the app to check for any updates. For e.g. if a user receives a new message or the phone battery is low, the user doesn’t need to explicitly open these apps to realize this new update, but can be notified through a notification.

  • Notification Icon appears in the status bar
  • When a user pulls down the notification drawer, then the notification is shown with the following properties:
    • Notification title
    • Time of the notification (inserted by the Android system)
    • The actual content of the notification

Create a Basic Notification

Below example generates a simple notification in the method sendNotification, which is called when a button is clicked in the Main Activity.

Important classes :

NotificationCompat, NotificationManagerCompat

public void sendNotification(View v)
{
    NotificationCompat.Builder builder = new NotificationCompat.Builder(this, channelId);
    builder.setSmallIcon(R.drawable.notificicon);
    builder.setContentTitle("You have a notification");
    builder.setContentText("This is just for testing a basic notification");
    builder.setStyle(new NotificationCompat.BigTextStyle().bigText("This is just for testing a basic notification , also testing if it can be expanded to a big text area." +
            "Some of my achievements are:" +
            "* Google certified Associate Android Developer\n" +
            "* Ring-Message : Android App on Google play store, solved problem of remembering stuff when someone calls/you call someone.\n" +
            "* Let's Read Them All : Android app on Google play store, solved problem of creating a book playlist and keep a track of unread books, encourages to read more.\n" +
            "* Humane Eating Project : Android App to encourage and increase awareness about humane eating\n" +
            "* Roomathon : Android app , won second prize in DamondHacks women hackathon, solved problem of finding roommates when moving to a new city\n" +
            "* Written an android blog https://androidwithdivya.wordpress.com/ to help others with small android problems which I encountered and learnt while learning everyday.\n" +
            "* Mozilla Open Source project : Refactored GLES2 implementation for Linux platforms, used by Servo web browser to render graphics, solved Servo's web browser implementation to render graphics on Linux systems\n" +
            "* ATC Certified Android Application Developer"));
}

Note : Generally, notifications are one liner, but if you want the notification to be able to expand to reveal more content, you can use BigTextStyle as shown above to achieve that.

Show the notification

To show the notification to the user, use the NotificationManagerCompat class and its notify method in the following manner:

NotificationManagerCompat manager = NotificationManagerCompat.from(this);
manager.notify(unique_id, builder.build());
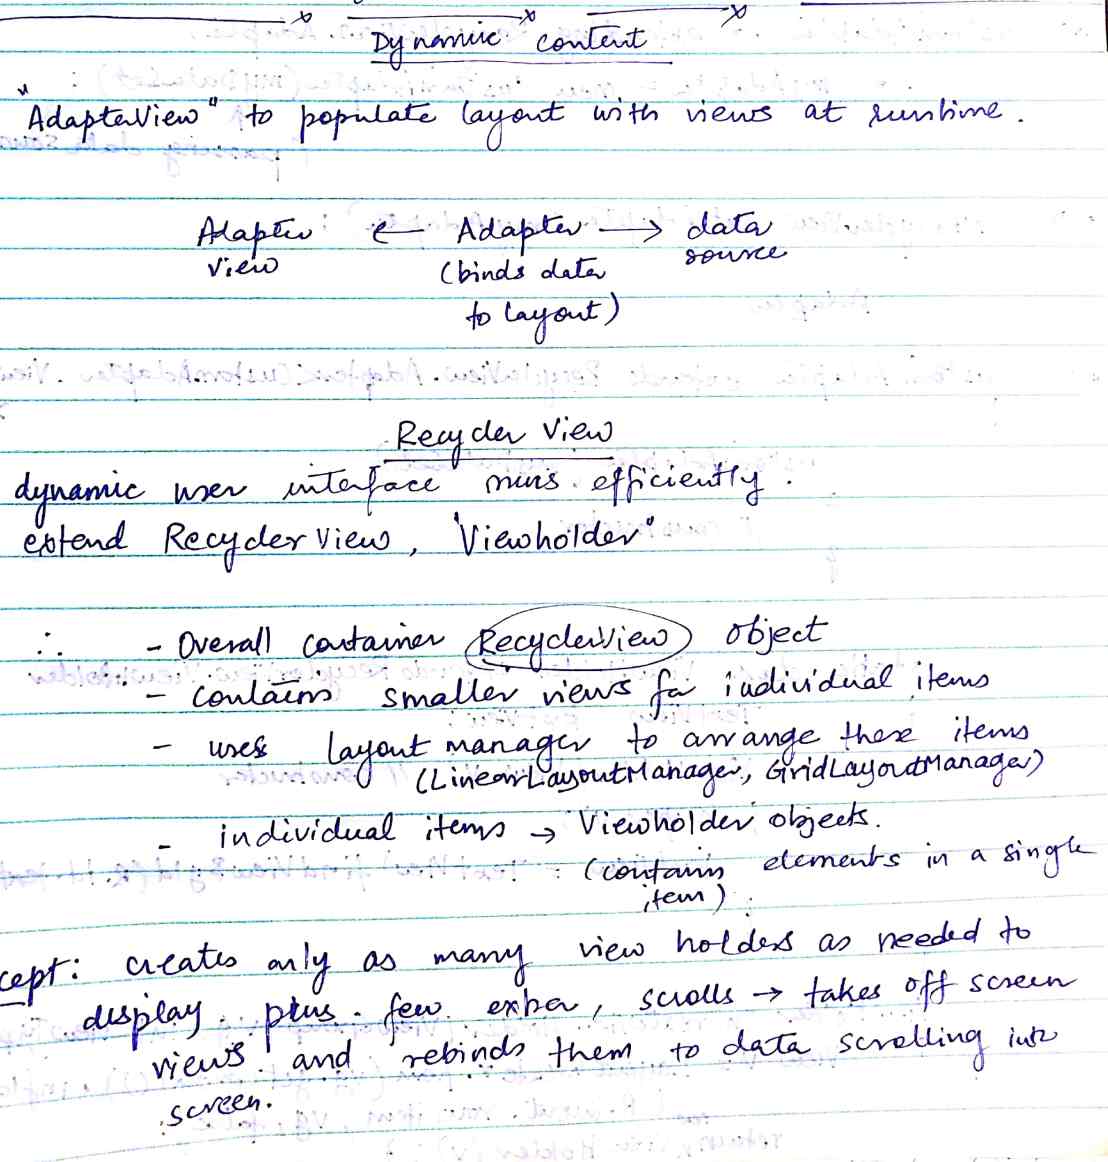
Adding Divider to your Recycler View !

When we add items to a recycler view, there is no default separation between these. In order to make your list of items look more presentable and a good distinction, below I demonstrate how to add a divider in between the recycler view items with a linear layout.

Note : For people new to Recycler view, I will write my next blog post explaining all about them and how to use them to create a dynamic list.

Here assuming the recycler view is already added to the code, we just use DividerItemDecoration to add the default dividers between items, in the following way:

DividerItemDecoration decoration = new DividerItemDecoration(this, DividerItemDecoration.VERTICAL);
recyclerView.addItemDecoration(decoration);

The constructor for the DividerItemDecoration takes two parameters, context and the orientation of the recycler view.

If we want to add a custom divider instead of the default one, create a Drawable divider_item xml as follows, specifying the height and the attributes of the divider:

<shape xmlns:android="http://schemas.android.com/apk/res/android"
    android:shape="rectangle">
    <size
        android:width="1dp"
        android:height="1.5dp" />
    <solid android:color="@android:color/holo_red_dark" />
</shape>

And set this drawable for the DividerItemDecoration shown above in the following manner:

decoration.setDrawable(ContextCompat.getDrawable(this, R.drawable.divider_item));

Sample code is available on github.


Add a dynamic shortcut to your app!

In Android API Level 25 or higher, you can define “app shortcuts” to specific actions in your app which can be displayed in a launcher ( Only some launchers are supported). Performing a particular action when user selects the shortcut is achieved by an intent.

Some use cases of adding shortcuts can be :

  • Sending message to a favorite contact in your messaging app.
  • Google Maps provides two shortcuts to navigate to Home and Work.
  • Adding favorite websites for browsing

There is a great podcast at Fragmented Podcast for learning more about App Shortcuts.

Below, I demonstrate a simple app which opens google.com at the launch of the app, but has an app shortcut added to it for launching gmail.com directly from the app launcher. This is a dynamic shortcut. The other types of shortcuts are static and pinned.

  • Add a WebView in the Main Activity’s OnCreate() method to load Google Url
    private WebView browse;
    browse = (WebView) findViewById(R.id.mywebview);
    browse.loadUrl("https://www.google.com");
  • Create a method called setShortcuts, inside which use the ShortCutManager to set Dynamic shortcuts, as shown below:
    @TargetApi(Build.VERSION_CODES.N_MR1)
    void setshortcuts() {
        ShortcutManager shortcutManager = getSystemService(ShortcutManager.class);
    
        ShortcutInfo shortcut = new ShortcutInfo.Builder(this, "id1")
                .setShortLabel("Web site")
                .setLongLabel("Open Gmail!")
                .setIcon(Icon.createWithResource(
                        this, R.drawable.ic_launcher))
                .setIntent(new Intent(Intent.ACTION_VIEW,
                        Uri.parse("https://mail.google.com")))
                .build();
    
        shortcutManager.setDynamicShortcuts(Arrays.asList(shortcut));
    }
  • Note: If the minSdkVersion of your app is anything less than 25, the above code will give an error “Call Requires API Level 25” , hence we need to add the following line before the function                              @TargetApi(Build.VERSION_CODES.N_MR1)


    which indicates that Lint should treat this type as targeting a given API level, no matter what the project target is.

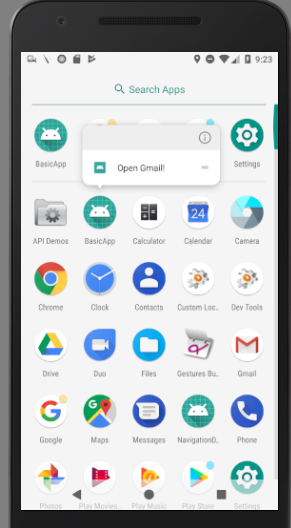
Once the above shortcut is added, when you test this app on any target device or emulator supporting Android version 7.1 or higher, long pressing on the app icon displays the shortcut as shown below:

AppShortcut

Sample code is available on github.

Room Library Sample App-easier alternative to SQlite !

Recently, I developed my own app “SaveThePassword” which helps me store all my user ids and passwords for different apps and websites that I have an account with. This gave me an opportunity to explore and work with Room Persistence Library (released by Google in 2017 as part of their Architecture components), A library that provides an abstraction layer over SQLite to allow fluent database access in your android app.

Below I am demonstrating a simple app that uses room library to store a Person’s details including name and age.

  • In Project Build.gradle, add the following maven repository:
    allprojects {
        repositories {
            maven { url 'https://maven.google.com' }
  • In Module Build.gradle, add the following dependencies:
    dependencies {
        compile 'android.arch.persistence.room:runtime:1.0.0'
        annotationProcessor 'android.arch.persistence.room:compiler:1.0.0'
        testImplementation "android.arch.persistence.room:testing:1.0.0"
  • Click Sync now.
  • Create a new Entity file Person.java, annotating it with @Entity. This represents the table within the database. It is a necessity to declare which field will be the primary key for the table.
    @Entity
    public class Person {
        public Person(String name, int age)
        {
            this.name = name;
            this.age = age;
        }
        @NonNull
        public String getName() {
            return name;
        }
        public void setName(@NonNull String name) {
            this.name = name;
        }
        public int getAge() {
            return age;
        }
        public void setAge(int age) {
            this.age = age;
        }
        @PrimaryKey @NonNull
        public String name;
        public int age;
    }
  • Now create the public interface DAO(Data Access Object) PersonDao.java , which contains different methods to access the Person Entity created earlier in the database.
    @Dao
    public interface PersonDao {
        @Insert
        void InsertPerson(Person password);
        @Query("SELECT * FROM Person")
        List getAll();
    }
  • Create AppDatabase class which extends RoomDatabase . Its purpose is to contain the database holder and serve as the main access point
    @Database(entities = {Person.class}, version = 1)
    public abstract class AppDatabase extends RoomDatabase {
        private static AppDatabase INSTANCE;
        public abstract PersonDao personDao();
    
        public static AppDatabase getAppDatabase(Context context) {
            if (INSTANCE == null) {
                INSTANCE =
                        Room.databaseBuilder(context.getApplicationContext(), AppDatabase.class, "user-database").allowMainThreadQueries().build();
            }
            return INSTANCE;
        }
        public static void destroyInstance() {
            INSTANCE = null;
        }
    }
  • In the layout file for MainActivity, activity_main.xml, add two edit texts for user to enter person name and age and a button, the click of which will save the Person to the Database.
  • In the Main Activity, get the instance of the database, and call the respective Dao method on the click of the save button to save the User entered person details to the database.
    db = AppDatabase.getAppDatabase(getApplicationContext());
    save.setOnClickListener(new View.OnClickListener() {
        @Override
        public void onClick(View view) {
            db.personDao().InsertPerson(new Person(name.getText().toString(), Integer.parseInt(age.getText().toString())));
        }
    });
  • Similarly, other queries can be specified in the Dao class and used anywhere in the application to access the underlying database.

Sample code is available on github.


How to check if you are connected to the internet in your Android app

For android apps which are dependent on the internet connectivity for their functioning, its always recommended to put in a check to ensure connectivity to the internet. Below, I will demonstrate how to check for internet connectivity in your android app.

  • Create a sample Activity with layout file as below:
<RelativeLayout xmlns:android="http://schemas.android.com/apk/res/android"
    xmlns:tools="http://schemas.android.com/tools"
    android:id="@+id/activity_main"
    android:layout_width="match_parent"
    android:layout_height="match_parent"
    tools:context="com.divyajain.internetconnectivitysample.MainActivity">
    <Button
        android:layout_width="wrap_content"
        android:layout_height="wrap_content"
        android:id="@+id/isConnected"
        android:text="Is Connected?"/>
</RelativeLayout>

The above layout file just consists of a button, which is clicked to check the internet connectivity, and the idea is that if the internet connectivity exists, the color of the button will change to green else it will turn red if no internet connectivity is there.

  • In the MainActivity file, get instances of the view and create a method called isConnected() as follows:
public class MainActivity extends AppCompatActivity {

    Button isConnected;
    @Override
    protected void onCreate(Bundle savedInstanceState) {
        super.onCreate(savedInstanceState);
        setContentView(R.layout.activity_main);
        isConnected = (Button)findViewById(R.id.isConnected);
        isConnected.setOnClickListener(new View.OnClickListener(){
            public void onClick(View v)
            {
                if(isConnected())
                {
                    isConnected.setBackgroundColor(getResources().getColor(android.R.color.holo_green_dark));
                }
                else
                {
                    isConnected.setBackgroundColor(getResources().getColor(android.R.color.holo_red_dark));
                }
            }
        });
    }
    private boolean isConnected() {
        ConnectivityManager connMgr = (ConnectivityManager) getSystemService(Activity.CONNECTIVITY_SERVICE);
        NetworkInfo networkInfo = connMgr.getActiveNetworkInfo();
        if (networkInfo != null && networkInfo.isConnected())
            return true;
        else
            return false;
    }
}

To check the Connectivity , we use ConnectivityManager  which returns active network information.

  • Add the following permission to AndroidManifest.xml
<uses-permission android:name="android.permission.ACCESS_NETWORK_STATE"></uses-permission>

Sample code is available on github.


Use Espresso for Android UI Tests!

Espresso is a UI test framework that enables you to write automated UI test for your android app.

Here I will give a simple demo about how to setup Android studio to use espresso 2.0 and write some basic tests to explore Espresso.

Firstly I created a simple Android project on Android studio, using create a new project. In the main activity, I just have a TextView with the text “Hello” and a button with text “Submit”.

To incorporate Espresso, below are the steps in order:

  • open build.gradle, and below dependencies should be available
  • dependencies {
     androidTestCompile('com.android.support.test.espresso:espresso-core:2.0')
     }

    Also in the defaultConfig, the testInstrumentationRunner should be present

  • defaultConfig {
     testInstrumentationRunner "android.support.test.runner.AndroidJUnitRunner"
     }
  • Now under app folder in project Files, in src folder, you should see a folder called androidTest/Java. Expand it, under the package, an ExampleInstrumentedTest file should already exist.

  • Create a new test file MainActivityTest.java under the same folder, with the following code.
  • 
    import android.support.test.espresso.assertion.ViewAssertions;
    import android.support.test.rule.ActivityTestRule;
    import android.support.test.runner.AndroidJUnit4;
    
    import org.junit.Rule;
    import org.junit.Test;
    import org.junit.runner.RunWith;
    
    import static android.support.test.espresso.matcher.ViewMatchers.isDisplayed;
    import static android.support.test.espresso.Espresso.onView;
    import static android.support.test.espresso.matcher.ViewMatchers.withText;
    
    @RunWith(AndroidJUnit4.class)
    public class MainActivityTest {
    
    @Rule public final ActivityTestRule<MainActivity> main = new
    ActivityTestRule<>(MainActivity.class);
    
    @Test
    public void MainScreenLaunching()
    {
    onView(withText("Hello")).check(ViewAssertions.matches(isDisplayed()));
    }
    }
  • In the above file, below are the important parts:
    • ActivityTestRule This rule provides functional testing of a single activity.
    • onView is an espresso method which takes a ViewMatcher as a parameter.
    • check is a method which takes ViewAssertions as a parameter. ViewAssertions are used to perform assertions on a viewElement.

For more information on different ViewMatcher, ViewAssertions etc, please refer to the Espresso cheat sheet.

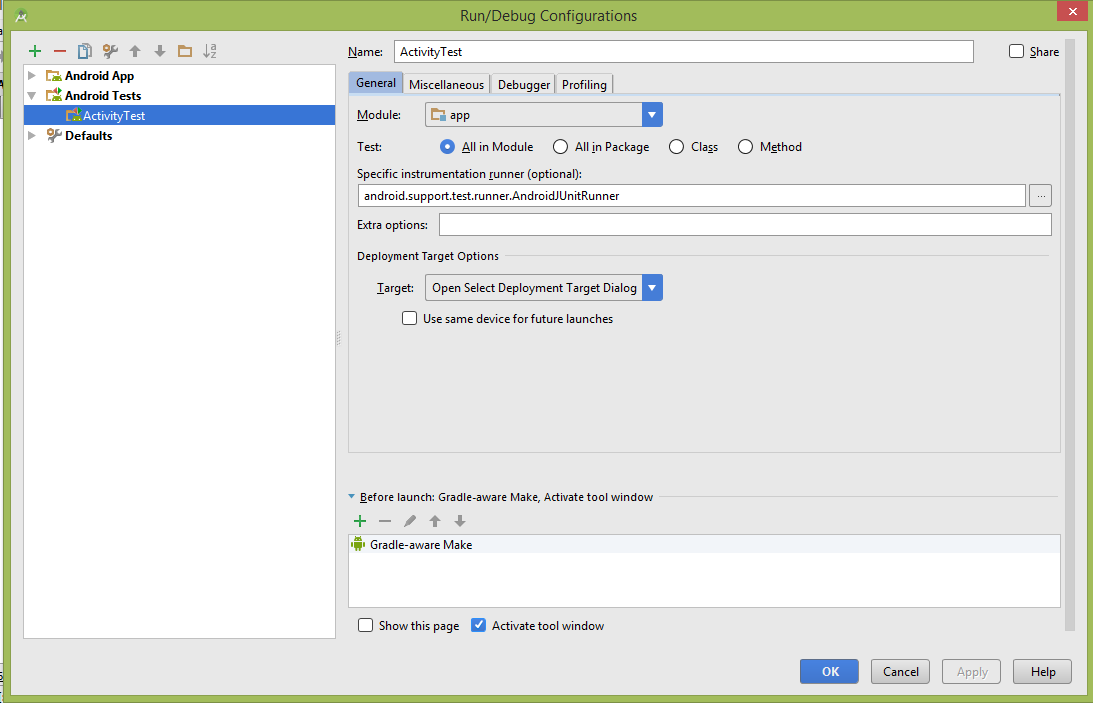
In order to run the tests, follow the below steps

  • Click on Run, then edit configurations
  • Then click on + sign on top left, and select Android Tests
  • Provide a name like ActivityTest in Name, select Module as app, and in Specific instrumentation runner, put android.support.test.runner.AndroidJUnitRunner and click on Apply

Capture

Now clicking on the run for the tests shows you how many tests passed or fail.

Capture

The sample code is available at github.

How to launch an activity only once for the first time!

Many a times, we come across a requirement where we have a sign up activity, which needs to be run only the first time the application is launched, and once the user signs up, the usual MainActivity of the app needs to be run.

Below I am going to demonstrate how to achieve the above functionality in Android. We have two activities, a signup activity with an edittext where a user needs to enter their email id and a submit button and a main activity which simply has a label with text “Test” written on it.

Create an android studio project with the above two activities.

The idea is to save a boolean variable in the sharedPreferences of the activity, with initial value as true, and the first time the app is run, pass the intent to the signup activity to be run, and set the value of the boolean variable to false. Hence consequently, the value of the variable is false and hence the signup activity will not be launched.

In the onCreate() method of the MainActivity, write the following code

Boolean isFirstRun = getSharedPreferences("PREFERENCE", MODE_PRIVATE)
        .getBoolean("isFirstRun", true);

if (isFirstRun) {
    //show sign up activity
    startActivity(new Intent(MainActivity.this, SignUpActivity.class));
    Toast.makeText(MainActivity.this, "Run only once", Toast.LENGTH_LONG)
            .show();
}


getSharedPreferences("PREFERENCE", MODE_PRIVATE).edit()
        .putBoolean("isFirstRun", false).commit();


The sample code can be found at github.


Using Firebase Cloud Messaging to push notifications to android app!

Here I demonstrate how to use Firebase cloud messaging to push notifications to your android application.

Go to firebase console and click on Create New Project

Enter a project name, select your country/region and select Create Project.
Click on Add firebase to your Android app
Add the package name of your android app in the popup
Click on Add App.
google-services.json gets downloaded automatically.
Add the downloaded json file to your project root.

Setup Gradle Settings

Open Project build.gradle file and add the following dependency:

dependencies {
      classpath 'com.google.gms:google-services:3.0.0'
  }

Open app module build.gradle file and add the following dependencies:

    compile 'com.google.firebase:firebase-core:9.0.1'
    compile 'com.google.firebase:firebase-messaging:9.0.1'

At the end of the file, add the following line

apply plugin: 'com.google.gms.google-services'

Click on Sync Now on top right to complete the gradle setup for firebase settings.

Create TokenService

Since each device needs to be uniquely identified for the notifications, Firebase provides FirebaseInstanceId class which takes care of creating unique device token each device.

Create a Service class that extends FirebaseInstanceIdService. Override the onTokenRefresh method that is called each time a new token is generated.

public class TokenService extends FirebaseInstanceIdService {

    @Override
    public void onTokenRefresh() {
        String newToken= FirebaseInstanceId.getInstance().getToken();
        Log.w("notification", newToken);
    }
}

Also, add the service class to the AndroidManifest.xml file.

  <service
        android:name=".TokenService">
        <intent-filter>
            <action android:name="com.google.firebase.INSTANCE_ID_EVENT"/>
        </intent-filter>
   </service>

Send the notification message from Notification Console to the app.

In the firebase console, click on Notifications in left.
Add the Messaging text and optional label , click single device for Target, add the registration token received in the logs above, and click on Send Message.

Note : Make sure the app is in the background and not on the foreground to see the notification.

The sample code is available on github.